
ProjectBench - Show Me Screenshots!
The following table presents a lot of screenshots of projectbench. While as developer,
I do appreciate getting my hands dirty with either installing a local version or using a live one,
I believe the level of details and the comments I have captures might server more people better.
So there, please feel free to see for yourself how projectbench looks like.
| Issues | |
|---|---|
 |
This is the login page. Registered users can choose to have the application
not bug them for a user/password for about two weeks by clicking the Remember my ID checkbox.
Please note that guest users can enter the system without having an account. They cannot do much (view some issues and create new issues), but it allows your users/customers to access the system without you having to create an account for each one of them. The guess user account can be turned off with a simple configuration switch. |
 |
The homepage is the first page users see after login. It allows user to select various modules to display, and even in the absence of those, if you look at the top of the page you'll notice it displays the number of issues assigned and opened by you. If you click the question mark next to the number it'll also display the number of issues in each status. |
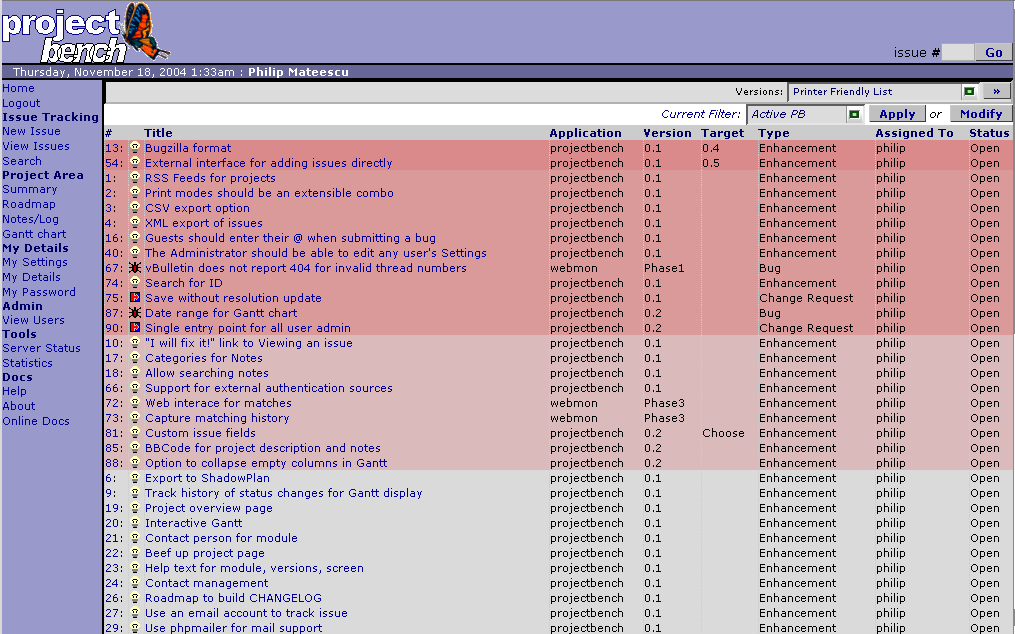 |
View Issues shows issues based on your current filter. You can create as many filters
as you like and save them with different names.
Notice the current filter displayed right before the issue list, in the combo to the right,
and the two Apply and Modify buttons to its right.
Clicking the Modify button will display the filter customization panel (see below).
Issues are colored based on their Severity and you can configure these colors to your liking.
Above the filter line, a combo might have caught your eye. It contains various options for displaying the Issue List (in a popup window): Printer Friendly List, Printer Friendly With Details, Text - Tab Separated, Text - Comma Separated (CSV) and XML Format. While it's pretty obvious what they do, I'm still going to detail them further down the page. Just like pretty much everything, it is configurable: the way it displays colors, icons, text, etc. There's even an option for making the filter panel permanently visible. |
 |
This shows a less colorful display of the View Issues page. It's configured to show colors only on Issue number and to use icons instead of text for issue types. |
 |
View Issues filtering means you can choose to display only those columns that
are relevant to you and filter to see only the issues you want. No other issue tracking software has that much power and flexibility. Not to mention that projectbench will always remember your last filter settings. |
 |
Configurable, of course - also the option to display the issue description in a tool tip when hovering over the issue number. This saves you time by allowing you to quickly glance at what the issue is about without going into details. |
 |
Clicking on an issue will initially bring you to this screen, the Issue page. First thing you'll probably notice is how the issue display color follows the Severity theme we saw on the View Issues page. We're also displaying a lot of information about the issue. Successive resolution updates are emphasized to be easy to spot. It may not be obvious, but when projectbench encounters the "#[0-9]+" pattern in the text it automatically creates a link to the bug having that id. At the right, there's a menu that contain all the actions available for the issue. The Close is only available to the user that opened the issue; the Delete entry is only available to administrators. At the bottom, the page spots a dependency display, where children of this issue or issues that depend upon this issue are listed. Common to the all the single Issue screens (View Issue, Edit Issue, New Issue), the navigation bat at the top contains the Previous and Next navigation links, whose purpose is to allow you easy access to the Previous and the Next issues, according to your current selected filter. |
 |
The Edit Issue screen breaks the page in 4 main areas: Description (read-only), the Resolution
updates that were made so far (read-only), field to update the current Resolution (required) and Details. However, what you're seeing in this picture is the simple version of Edit Issue (same for entering a new issue). Given the data requirements are minimal, this view mode is best suited for non-technical persons which would only have to enter the application, the name of the screen/page/file in which the bug/etc occurred, the type of the issue, the status and the person to whom the issue is assigned. Upon saving, the combo to the left of the Save button lets you choose what is the place you want to be taken after saving the issue. Your three choices are: Save and Go to View Issues, Save and Add New Issue, Save and Stay in Edit Mode. The view is configurable, plus at the bottom of the window there's a link that allow you to change to the full view (see below). |
 |
Now we're talking! This Edit Issue display mode shows the entire range of data that can be entered
for an issue (the New Issue spots a similar interface). While it contains far more information, it is so grouped to make sense and to help with data entry. Not everything is required, but the more you enter the more accurate information you get in reports. For example, if you set the Target Version for date xx/yy and an Estimate of 3 days but no Due Date, the system will behave as if Due Date was the target date of that version and the start date for that issue would be Target Date - Estimate. If you do this for all your issues, you'd probably notice a pile up of tasks all ending on the Target Date. You don't have to set the Due Date as you enter the issue, but a wise way to use it would be for the developer to review the issue and set an Estimate; the Project Manager, can then come and set the Due Date according to priorities and resource allocation. The beauty of projectbench comes from the fact that you can use the Optional Information and the Completion Information to better manage your projects, or you can choose to ignore most of them if you don't care that much about the project management part and you only want to track issues. As of version 0.4, the Description and Resolution fields are now collapsable/expandable. What that means to you is that if you have a really long description or a long resolution, you can click on the image to the right of each field and toggle the display. Even more the fields are now capable of displaying richer markup. |
 |
Notice how New Issue has an even lesser interface than the Edit Issue. The Status and the Assigned To fields are no longer present, as they can be safely defaulted to Open and respectively the Project Manager of the selected app. |
 |
Obviously the Completion Information fields are missing from the New Issue screen, but the Optional Info is still present as it allows for the advanced user for some level of planning from the get-go. |
 |
Whether you created a new issue or you saved an existing one, you get a confirmation page which tells you your changes have been saved. Part of the iformation it displays is the issue number so you can easily refer to it later by typing it in the issue # box atop of every page. It also gives you a quick link you can use to directly access the issue in view mode. |
 |
One of the links on the right side on the right hand side of the Issue screen is Print, which opens a new popup window displaying a printer friendly version of the issue. |
 |
Issue History behaves similar to the Print Issue option and displays the detailed changes that occurred, including changed fields. |
 |
Printer Friendly List (of issues) is the printer friendly version of the View Issues screen and displays in a simple format the list of issues as viewed in the View Issues screen. This pop-up window has the same columns and same data filters as those you have used for the View Issues. |
 |
Printer Friendly List - With Details lists all details of the issues visible in the View Issues screen. It is, if you will, the combined display of the Print Issue for all the issues visible. |
 |
Text - Tab Separated prints the list of issues in plain text format with tabs separating the fields/values. Quite the same, the Text - Comma Separated (CSV) prints the list of issues in plain text format, but the fields are separated by "," and are proper enclosed in double quotes where required. You might find both particularly useful if you want to import a certain view into OpenOffice or Microsoft Excel (either save the result as a .csv file, or user the menu command Edit->Paste Special...->Text) as it will paste the results directly in a table format. |
 |
XML Format lists all details of the issues visible in the View Issues
screen in a nice XML format. Use this one if you intend to import or process them. The format is really simple:
<issues>
  <issue>
    <[fieldname] label="[Field Label]">[fieldvalue]</[fieldname]>
    ...
with the fields id and title always present.
|
| Search | |
 |
Besides the direct search by issue id in the top right corner of every page, projectbench also offers a reasonable search engine. You can limit or expand the area to search to issue Title or include the Description; you can search a single application or all of them. |
 |
The Search Results come back in a simplistic display. However, depending on your settings, they do feature the tooltip display of the description to help you locate faster the issue you want. |
| Project Management | |
 |
The project Summary page attempts to quantify various aspects of the issue tracking for
and application/project. These areas are: number of issues by Status, by Severity, by Type,
by location/process in which were found (Found In), and by Users that have opened them. You might find pleasantly surprising that you can click on any of the numbers listed and it'll take you to the View Issues page to display the issues that fit those specific criteria (eg. click on the "app" by Severity -> Showstoppers figure to see all showstoppers for "app". |
 |
The Roadmap is a feature guaranteed to be loved by both those who are project
management conscious and by those who are more free spirited (= as lazy as I am).
Think of the Roadmap as a quick project history broken down by versions,
or as a CHANGELOG for those of you familiar with this wonderful feature of (mostly)
Open Source projects. The Roadmap breaks down the issues by version (Target Version that is, as projectbench assumes the issue was solved in the Target Version of the app). You can quickly make a change log out of it; and for those interested in the resource allocation, notice how the table to the right displays the number of days allocated to each developer (using the Estimate field). |
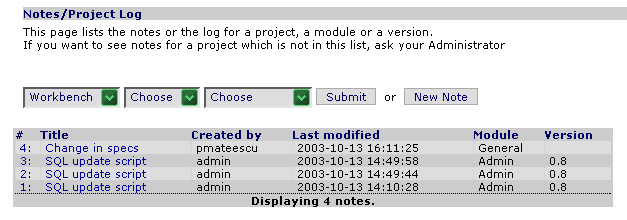 |
I've built the Notes with the initial intention of keeping track of SQL script updates,
to have an easy way for my team to see them and run them. However, you can use it for whatever you feel like. From my experience in using it, it does seem to provide a way to gather notes, specs, changes - everything that is usually lost in emails. Really useful for later retrieval. |
 |
Note Display screen. Looks familiar to the Issue screen, doesn't it? |
 |
I warned you about the Gantt Chart way above when we discussed how good, detailed
data keeping on issues allows the app to produce better, more exact reports.
This cropped picture shows actually what happens when you DO NOT maintain those details :). See
how the times piled up towards the target? Anyway, if you do enter those details, and if your developers do too, then the Gantt Chart is a project manager's dream. Or nightmare... YMMV :) |
| Settings and Configuration | |
 |
I kept mentioning how configurable projectbench is and here in the My Settings
page you can see I wasn't lying that much :) Most of these options are quite explicit and those that are not you'll find more about them in the docs. Please note that while there is a default set of settings, each logged in user can customize the application to his liking, and that includes colors, display, even email notifications. |
 |
The My Details screen for a user keeps it to a minimum. Some improvements are planned. |
| Admin Tools | |
 |
You can Manage Users either individually or in batch mode. This screen
shows the individual setup of a user. You can disable the account, set the Group
the user is in and control access to projects. Check the checkboxes in the Project Access section to allow users to view, enter and edit issues on a project. When the checkbox has a gray background, it indicates the user you're editing is Project Manager on that app. |
 |
The Access Matrix Display view mode of the Manage Users
allows you to edit roles and access to projects in batch mode. It makes a lot of sense
when you're trying to figure resource allocation. Same as the previous one, checkboxes on gray background indicates Project Managers. |
 |
Groups are not really security roles, they're more labels. The one feature they do have, though, is that they control whether members belonging to a group can be assigned issues. Depending on your organization setup, it might make sense for Customers and Administrators not to have issues assigned to them. |
 |
We'll spend a few screenshots on the Manage Project pages and this is the first one. What you're seeing here is the View Mode. You can see all features of project and edit all of them. There is the Manager of this application/project. Then there are Versions which you can customize to your liking. Since the Version is really a string, you can use whatever scheme you deem appropriate; a few examples would be major.minor (e.g. 1.0, 1.5), major.minor.build (e.g. 1.0.1, 1.0.2); you can even include designations (e.g. 1.0 RC1, 1.2 alpha) as pretty much anything goes (including "My First Hello World" versions (: ). projectbench does quite a good job at sorting the versions properly, for example: 0.9, 1.0 alpha, 1.0 beta, 1.0 RC1. |
 |
This one shows a Project with slightly more versions and more modules. It also shows how you can set Target Dates for version and you can have links to those versions. |
 |
When editing a Project Module you can enter a Name, its Description, and you can choose to make it visible or hidden. |  |
When you edit a Project Version you can set, besides its number/designation, whether it's visible or not, a Target Date for the release, a Link to the version (it can be either to source code, to the binary, to the site - whatever you want) and a small description of the Requirements of this version (software, hardware, etc). |
 |
If you filled in the Requirements for a version, as you hover over the To Version link, its tooltip will show the Version Requirements you entered. |
 |
In the next section you'll see a couple of the site-wide and framework settings. Please note that while some
of them are somehow safe to change, others might result in your site behaving incorrectly. In this screen you can edit the Found In table, which lets the issue submitters indicate where/when/how they came across it. You can hide some of them if they don't make sense for your organizations or projects. I recommend you set the description so your users can get some help when trying to figure out the various options. |
 |
The Type table deals with various types of issues projectbench supports. As before,
I recommend you set the description so your users can get some help when trying to figure out the
various options. You should not mess with the Name, as it might be used for some logic. However, if you do change the name, make sure the corresponding images are also renamed (you can find them in the images/ folder and they're named [typename]12.png - lowercase). |
 |
The Status table is one of the sensitive one. Try not to change the Name
or Hide at least the Open, Closed and Fixed
values. As before,
I recommend you set the description so your users can get some help when trying to figure out the
various options. |
 |
The Severity table allows you, among others to change the color of the issues. Make sure you set the description - otherwise you'll probably get users to enter most issues either as Showstoppers or Criticals :). |
| Tools | |
 |
The Server Status allows you to have a single page displaying the status of multiple servers/services. You can enter a Server Name or IP and a Port, and projectbench will try connecting to each one of them and seeing if they're available. Useful is you want to monitor internal servers from an outside network. |
 |
Another one of them funky (somewhat) useless statistics, the Site Usage shows some statistics about... well... the usage of projectbench. |
 |
A list of All Users with contact info and last time they were seen. |