ProjectBench - Installation and Administration Guide
Welcome to the projectbench installation and administration guide. This document should tell you everything you need or want to know about installing and administering projectbench. It is broken into two main sections:
- Installation - deals with application requirements and creating a new projectbench installation.
- Administration - describes common maintenance tasks. Administration does not describe usage of projects or issue tracking; these are all part of the Usage Guide
1. Installation
There are two ways to create a new installation of projectbench: over the web install and console installation.
The web install is the simpler of the two and it only requires that you upload the application to a web-visible folder
on your web server and then access an install URL using your browser.
The console installation requires shell access to the web-visible folder where you copied the projectbench source,
and some text editor like VIM to modify the configuration files.
Upgrade Note:
If you are upgrading from a workbench v0.11 please read the following notes. projectbench v0.1 has major database schema changes from workbench v0.11. It is strongly recommended that you use the supplied install.php as it not only updates the database structure, but it also imports settings and other fields to the new format. For future projectbench upgrades, the usage of install.php is recommended and encouraged.
1.1 Prerequisites
- Base Requirements - projectbench requires PHP 4. projectbench makes use of sessions,
so you'll need to ensure your PHP configuration supports them. Also we recommend, if possible, having the following
buffering and error reporting setup in your php.ini file:
It is not know whether projectbench works with PHP 5. Preferred version is PHP 4.3.output_buffering = 4096
track_errors = On
error_reporting = E_ALL & ~E_NOTICE
display_errors = Ondisplay_errors = Onshort_open_tag = On - Database - MySQL 3, 4 or greater is required. projectbench does not use any special MySQL features and therefore it might work with even the oldest or newest versions of MySQL. Preferred version is MySQL 4.0
- Operating System - projectbench works with any operating system that is capable or running PHP and MySQL. It has been tested, deployed and successfully used on both Linux and Windows. Linux is the preferred operating system as it is easier to deploy and maintain.
- Web Server - any web server capable of running PHP 4 (Apache 1, Apache 2, IIS have been tested and reported to have been successful).Apache 2.0 is the favored web server because of stability and features.
- Optional - SMTP server. You will need an Email (SMTP) server if you would like to benefit from projectbench email notification features.
- File System - you will need to have write permission to several folders and files. You'll need to have write permission to the folder where you plan to install projectbench. Given your setup, you might also need to have permission to modify your web server configuration. If you put projectbench in a subfolder of an already web-visible folder (e.g. htdocs or wwwroot), you do not need to modify any server config. The user that your web server runs under (apache, nobody, IUSR_*) will need to have write permissions to the folder where you plan to store your uploads. Depending on your type of installation, either you or the account your web server runs under will need to have access to the config.php file.
- Browser - projectbench makes use of CSS and JavaScript, however nothing really tricky to cause compatibilities with any modern browser. Although Microsoft Internet Explorer has a broken implementation of CSS, efforts have been made to ensure the display and functionality are not perturbed. The projectbench team favors Mozilla since is more developer friendly.
1.2 Over the Web Install
If you have downloaded a tar.gz/tar.bz2/zip file, extract the files using one of the following commands:
tar xzvf projectbench-v*.tar.gz- for .tar.gz
tar xjvf projectbench-v*.tar.bz2- for .tar.bz2
unzip projectbench-v*.tar.gz- for .zip, or use your Zip/Unzip utility (WinRAR, WinZip, etc)
As a result, you should get a folder named projectbench-v*. Copy the content of this folder to the web server,
ending up with, for example /var/www/html/projectbench/ or C:\Inetpub\wwwroot\projectbench.
Check to make sure the account the web server runs under has permission to modify the config.php and then open a browser
and type in: http://myserver.mydomain/projectbench/install.php.
Congratulations and welcome to the projectbench installer. Although the installer itself is pretty explanatory,
the following parts will attempt to guide you through its steps.
1.2.1 Step #1 - The Welcome Screen
Please read this screen carefully even it's just a bunch of gibberish :). Please note the requirements and the license. Click on the Begin » button to start the actual install process.
1.2.2 Step #2 - DB Server Setup
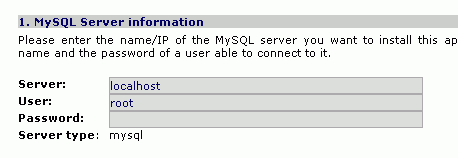
This step allows you to configure database access. You will need to provide the name or IP of the machine
that is hosting the DB server; under normal operating conditions, it would probably be the same machine as your
web server, so the default value of localhost is a good guess.
Default setups of MySQL do not require a user or password to access the server, however, it is recommended
for better security to have a user created for the sole purpose of accessing the projectbench
database.
When you have entered the information, click the Next » to go to the next step.
1.2.3 Step #3 - Database Selection
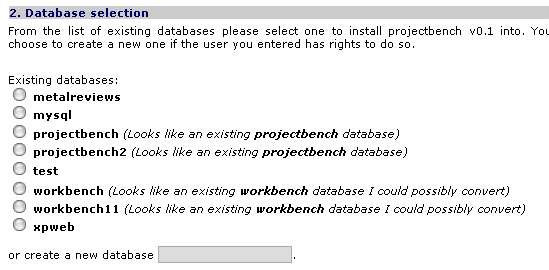
The next screen you'll see allows you to select the database in which the projectbench tables
will be stored. You can select an existing database or create a new one. Using an existing database will NOT
overwrite any tables as projectbench has its own table prefix (default pb_) which you can also configure in a
later step.
You'll notice in the picture above that the installation script detected existing projectbench databases as well
as previous workbench installations. You can opt to convert existing workbench installations to
projectbench thus preserving your existing data. Selecting an existing workbench database at this point
will not automatically import it!
1.2.4 Step #3 - Data Import
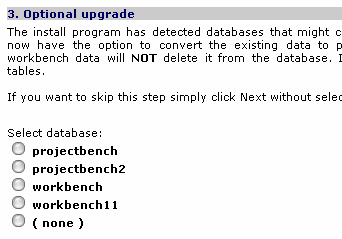
If the install script has detected existing versions of either projectbench or workbench,
it will give you the option to select a database to be converted.
Please not that whether you choose to convert existing data or not, your original data will not be affected!
1.2.5 Step #4 - Parameter Configuration
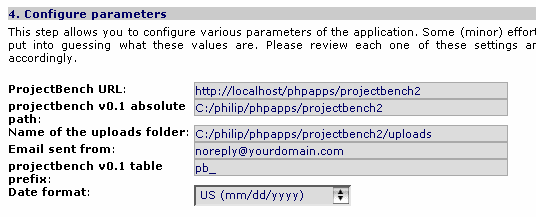
In this step you will configure some of the parameters required for the well-functioning of the application.
projectbench's install attempts to make some minimal but decent guesses as to what these parameters are,
and in a usual installation scenario is mostly right. However, if you installed the application in some
custom folder, you might wanna check them and make sure they're right.
- ProjectBench URL - This the web address of your projectbench website.
Here's a trick: if your website has two addresses (for example an internal one and a fully qualified external one),
then you might consider removing the http://[server.domain] part and leaving only a relative path, e.g.
/apps/projectbench. - projectbench absolute path - Absolute (filesystem) path of your projectbench installation. If you receive errors like failed to open stream: No such file or directory in... then you probably got this one wrong.
- Location of the uploads folder - The uploads folder will hold all your attachments. Please make sure it's a folder to which you have write access, and even though projectbench has some security measures in place to prevent direct access/links to the proposed "uploads" folder, it is recommended you choose a location that is not visible from the web. Besides, thanks to the useful .htaccess file, only Apache is capable of hiding the folder.
- Email sent from - When a user is notified through email about changes to their issues (according to their individual settings), this is the email address that will appear in the "From: " field.
- projectbench table prefix - This is projectbench's version of playing nice with others. It prefixes all projectbench tables with this string. You'll find this feature most useful when your website is hosted and/or you have access to only a single database. The prefix ensures tables do not get overwritten by some other app. Also, this way you can even keep multiple versions of projectbench under a single database.
- Date format - The date format to be used for capturing and displaying dates. If you operate in a non-US environment, you might find beneficial to select another format of date. This will not change the language in which projectbench operates, but will give your users a more comfortable way to enter dates.
1.2.6 Step #5 - Review configuration
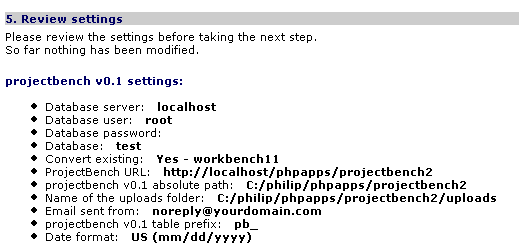
Up to this point no changes have been made to any file or to any database.
This screen gives you a last chance to review the configuration and go back and make any adjustments.
Clicking next will begin the actual install process, so please take your time and ensure everything
is accurate.
1.2.7 Installation Complete
The last page will be displayed when the install process has been complete, all tables
have been created, imports if any were made, and changes to the configuration file
have been committed.
If there were errors in the process it also displays them. Examine them closely.
projectbench comes by default with a single user admin and its default
password is seatonplace - any sweet workbench memories? :)
Congratulations! You have completed your web install!
Please continue reading the Post-Installation Guide for a few
tasks you might consider doing right after finishing the install (or right after the beer
following the completion of the install - your choice).
1.3 Console Installation
You should read this section even if you plan to do the Over the Web Install
as getting familiar with the config.php file will allow you to safely change installation parameters
at a later time.
In order to perform the console installation you should have access to and be familiar to a text editor.
Also depending of your operating system, knowledge of shell commands will prove beneficial.
This step will assume you have already copied the files from the archive to a folder and that you have proper permissions to modify files in that folder.
1.3.1 Linux Settings
Obtain a shell on the Linux box. You can use ssh or telnet. Change to the folder you have copied the application in. We will assume the following setup:
Your web server's name is firefly.infinitefire.com Your web server's root is /var/www Application's folder is /var/www/apps/projectbench.
The folder for uploads is /var/www/pbuploads.
The MySQL server is hosted on the same machine and you'll be using an existing database called test. There is a projectbench@infinitefire.com account for emailing purposes.
1.3.2 Windows Settings
If Windows is your choice for operating system, let's assume the web server is Internet Information Server (IIS) and we'll assume the following setup:
Your web server's name is firefly.infinitefire.com Your web server's root is c:\inetpub\wwwroot Application's folder is c:\inetpub\wwwroot\apps\projectbench.
The folder for uploads is c:\inetpub\wwwroot\apps\projectbench\uploads.
The MySQL server is hosted on the same machine and you'll be using an existing database called test. There is a projectbench@infinitefire.com account for emailing purposes.
1.3.3 The config.php File
This section applies to both Linux and Windows installations. It will use the examples from the Linux section,
but the Windows one should be no different. One thing you need to remember though: the path separator in Windows,
\, is also the escape character in PHP and therefore you either use / or you escape
all occurrences of this character, e.g. c:/inetpub/wwwroot/apps/projectbench or
c:\\inetpub\\wwwroot\\apps\\projectbench.
Open the config.php file in your editor. At the top of the file you will find
the possible configuration options. Let's review each one of them:
- $CFG->url - This the web address of your projectbench website. In our case it could
be http://firefly.infinitefire.com/apps/projectbench.
Here's a trick: if your website has two addresses (for example an internal one and a fully qualified external one), then you might consider removing the http://[server.domain] part and leaving only a relative path, e.g.$CFG->url="/apps/projectbench";. - $CFG->path - Absolute (filesystem) path of your projectbench installation.
We need to set this to
$CFG->path="/var/www/apps/projectbench";. If you receive errors like failed to open stream: No such file or directory in... then you probably got this one wrong. - $CFG->uploads - The uploads folder will hold all your attachments. In this example
we would set it to
$CFG->uploads="/var/www/pbuploads";.
Please make sure it's a folder to which you have write access, and even though projectbench has some security measures in place to prevent direct access/links to the default /var/www/apps/projectbench/uploads folder, it is recommended you choose a location that is not visible from the web. Besides, thanks to the useful .htaccess file, only Apache is capable of hiding the folder. - $CFG->email_from - When a user is notified through email about changes to their issues
(according to their individual settings), this is the email address that will appear in the "From: " field. Set it to
$CFG->email_from="projectbench@infinitefire.com";. You can set it to a bogus address (e.g. support@microsoft.com) if there is no need for users to be notified by email. - $CFG->table_prefix - This is projectbench's version of playing nice with others.
It assumes all projectbench tables are prefixed with this string. Default is
$CFG->table_prefix="pb_".
You'll find this feature most useful when your website is hosted and/or you have access to only a single database. The prefix ensures tables do not get overwritten by some other app. Also, this way you can even keep multiple versions of projectbench under a single database.
If for some reason you want to use another prefix for this parameter, make sure you change it in the sqlscripts/projectbench.sql BEFORE you run this file. - $CFG->date_format, $CFG->time_format,
$CFG->js_date_format, and $CFG->js_lang
- The date and time format to be used for capturing and displaying dates.
If you operate in a non-US environment, you might find beneficial to select another format of date.
This will not change the language in which projectbench operates,
but will give your users a more comfortable way to enter dates.
In our example we'll leave it at the default value of$CFG->date_format = $CFG->{$CFG->DATE}['date'];and$CFG->time_format = $CFG->{$CFG->DATE}['timestamp'];. - $CFG->dbserver - The name or IP of the database server. Since in this example (and
in most real-life scenarios) it is hosted on the same machine, we'll leave it at
$CFG->dbserver = "localhost";. - $CFG->dbname - Name of the database that will store the projectbench tables.
We decided to use test therefore this setting will be:
$CFG->dbname="test";.
If you're planning to install to a new database, consult MySQL's documentation on how to create new databases. - $CFG->dbuser and $CFG->dbpass - these values will normally be supplied by your administrator. A default installation of MySQL allows local access without a user or password, and therefore we will leave them empty for now.
Okay, if you got this far you're probably done. Navigate to your installation root
and if everything went fine you should see projectbench's nice login page:

1.3 Post-Installation Guide
If you have just finished installing projectbench then there are a couple of things we recommend you consider.
- Rename the install.php file - Whether you've done the Over The Web Install or the Console Install, make sure you disable t the install.php file. You can delete it or you can rename it to some harmless extension (.txt).
- Change the admin password - Remember, by default, all new installations use
seatonplace as their default password. To change the password for the admin
account use the
My Passwordlink in the My Details section. - Customize the admin profile - Use the links in the My Details section to customize the admin profile and its settings.
The Admin menu section contains several optional post-install tasks you might want to consider doing:
- Create users - Use the User Admin entry to create new users (or to review existing users if you have upgraded from workbench)
- Create projects - use the Project Admin menu to create new projects.
- Issue Admin will allow you to configure the Status, Type, Severity and Found In tables.
For example you can add, edit and hide the default fields in all of these tables until they meet your own requirements. The Description field in each table is displayed on the Help page. It is good practice to fill in these values as it will help your users understand the application.
Note: Please try not to alter the Status table, save for the Description field; at least not until you understand better their impact on the application.
Give yourself a beer and a pat on the back for completing this section. If you have followed all the steps in the Install and Post-Install Guides, you should now have a working and ready to kick a$$ projectbench!
2. ProjectBench Administration
projectbench is designed to be a powerful issue tracking web-application with
project management features. A powerful application has to be different things to different persons:
to users or developers it has to be easy to use, to managers it has to provide higher level views
and allow them to manage resources, to administrators it has to be flexible and customizable. projectbench
attempts to meet these needs by offering a complete interface yet customizable for each user to the level they
fell they're most efficient using it.
This section will concentrate mainly on how projectbench's features help administrators and how
it makes their life easier. You'll be happy to know projectbench is not
maintenance intensive and most options once you've set them out you probably won't really need to touch them again.
projectbench has several layers of maintainability and accountability, and it's all based on roles. For example,
administrators create projects and can define a project administrator, versions, can create users and set the access permissions.
However, once the project created the project, the maintenance role is taken on by the defined project manager who can
do almost the same things as the administrator. Thus the project manager can customize his/her projects without the involvement
of the administrator. Furthermore, a lot of pages have user level customization, in which each user can define
the view that is best suited for his needs. For example a team leader or project manager could choose to see all open
issues on a project, while the developers could choose to see new issues assigned to him on any project he/she's
working on.
This section will attempt to deal with:
- Set Passwords - changing the login password for other users
- User Admin - maintain app users, create new ones and set project access
- Group Admin - maintain existing user groups and create new ones
- Project Admin - maintain existing user groups and create new ones
- Issue Admin - change reference values and application wide setting (be careful!)
- Server Status - change reference values and application wide setting (be careful!)
Set Passwords
Use this entry to change password for users who have forgotten their passwords.
projectbench has no option to retrieve the password through other means (email,
secret questions, etc). At least not as of now.
User Admin
Use this tool to create users and manage the existing users' settings. You can disable accounts,
change the group a user belongs to, and configure the access to projects.
The second entry in the user selection combo (or the first useful one)
(Access Matrix Display) lists in a grid format all the users,
their roles and their access to projects. In the access columns, gray background cells
indicate the user is a Project Manager on that particular project.
While it contains far more information (and has the potential of becoming slow with a really
large number of users - Note: "really large" is yet TBD), it also provides a quick glance
at how users are associated with groups and projects.
Group Admin
This administration option allows you to maintain the user groups. User groups are mostly informal, for labeling purpose, and not much security is based on them. However, they do allow you to limit what users can be assigned issued. For example, in a normal scenario, it doesn't make sense to assign issues to Customers, and therefore to prevent accidental assignment to this user group you can choose No for the Can issues be assigned to members of this group? entry.
Project Admin
This tool is probably the star of the admin group of utilities. It allows you to create and modify existing projects.
This is also the only tool available to administrators and to special users - users that are
Project Managers. The project managers will only be able to see and modify the projects they own,
while administrators can modify any project.
 The administrators and project managers can configure:
- The name, description and visibility of the project
- The project manager
- Project version names, target dates for each versions, version requirements, and links to versions. Keep versions properly managed will aid you in a more accurate tracking of issues and releases. Please note that link can mean whatever you want to: either pointing to the download the source code for that version, or binaries, or simply
- Module names and visibility. Again configure these properly for better issue tracking.
Please note that when a project is hidden then you won't be able to search for its issues, you won't be able to create issues on it, etc. If you only want to restrict the access to a certain project, you might want to look into the User Admin tool.
Issue Admin
If the Project Admin tool was the star of the Admin section, Issue Admin is the most
dangerous one. You should limit your actions to only changing the description (and it is really
recommended you do for the sake of better user experience) and none of the other settings
till you get more familiar with the website. Or you're brave enough.
Okay, if you're brave enough, or just curious, here's a brake down of each of these reference tables:
- Found In - controls the reporting on where the issue was found. These settings are somehow safe. You can make some of them hidden if they don't apply to your setup. For example, if you are a web design company, then probably Unit Test and Link Test do not really apply to you.
- Type - you can limit or extend the type of issues your users can report and maintain. You can even safely disable some of them. If you're only in maintenance mode, then probably it wouldn't make too much sense to have Enhancement (or RFE) as part of the type of issues that can be submitted.
- Status - (better not to) change the accepted resolution of issues. A lot of the behind the scenes logic is based upon these statuses. If you're inappropriately hiding some of these statuses, projectbench may start to behave unpredictable (to tell you the truth, I never ever messed with them). At a minimum, you should leave Open, Closed, and Fixed all alone. You can however, and should, change their description to match your organization's needs.
- Severity - welcome to the colors. Change the colors to something else and change the description; that always helps. Please remember that the application relies on these settings to determine certain class of bugs. For example, if you mess around with Showstopper and Critical issues, your projectbench might not be able to render correctly certain homepage modules (such as Showstoppers and Criticals assigned to You, d'oh).
Server Status
While this one is part of the tools, it might still spark the interest of the administrator in you.
Here you can register and monitor various servers and services. This might prove useful when you need to
monitor certain computers inside a network. For example, let's assume the following setup:
Let's say projectbench is installed on infinitefire.com and you have two computers not visible or partially visible from outside your network: Firefly and Froggy. Firefly (192.168.0.2) is your CVS and shell server, and Froggy (192.168.0.3) is your girlfriend's computer. While you can obviously connect to firefly's CVS and SSH ports to see if those services are up (assuming their respective ports are forwarded through your router), checking to see if your girlfriend's web server is up might prove a little bit more difficult if that computer is completely shielded (no forwards).
In this case, projectbench provides an easy solution: add three entries to your list of servers,
192.168.0.2:2401 for CVS, 192.168.0.2:22 for SSH and 192.168.0.3:80 for froggy's HTTP.
Now you can connect remotely to your projectbench and see the status of those three services in a single
page, without having to prod each machine/port individually.
It may not sound that much of a deal, but I've used it successfully to check the status of a great deal of
servers from a single point. That has helped a lot at times.
The End
If you got this far, you're obviously some kind of freak and I want to personally congratulate you. And I also
want to say thanks for allowing me to show you a couple of behind-the-scenes shots of projectbench.
Happy hacking!
Philip Mateescu
